Keyhole Gardens - How to Make Your Own

In the last instalment, we looked at Keyhole gardens and why they are an awesome use of what is otherwise wasted space. These days urban stands are expensive and the size of the average stand is shrinking. The average stand is now only about 300m2. This means it’s often impossible to have a full-featured garden. Most people just end up paving the entire unbuilt area. You can however build a keyhole garden even on such a tiny stand.
Building a keyhole garden is easy. You can even do it yourself if you are handy with tools and love DIY projects. Either that or you can hire someone and give them detailed instructions of what you want. The great thing about Keyhole gardens is that you can tailor-make them to fit your stand and needs.
Generally, you need to follow these steps to build a keyhole garden. As already hinted on, you can tweak these steps to suit your exact needs:
Decide on the shape and plan of your garden. Remember these steps are not always serial, you can perform some steps concurrently. For example, deciding on the shape and size of your garden is influenced by the site you want to build the garden on.
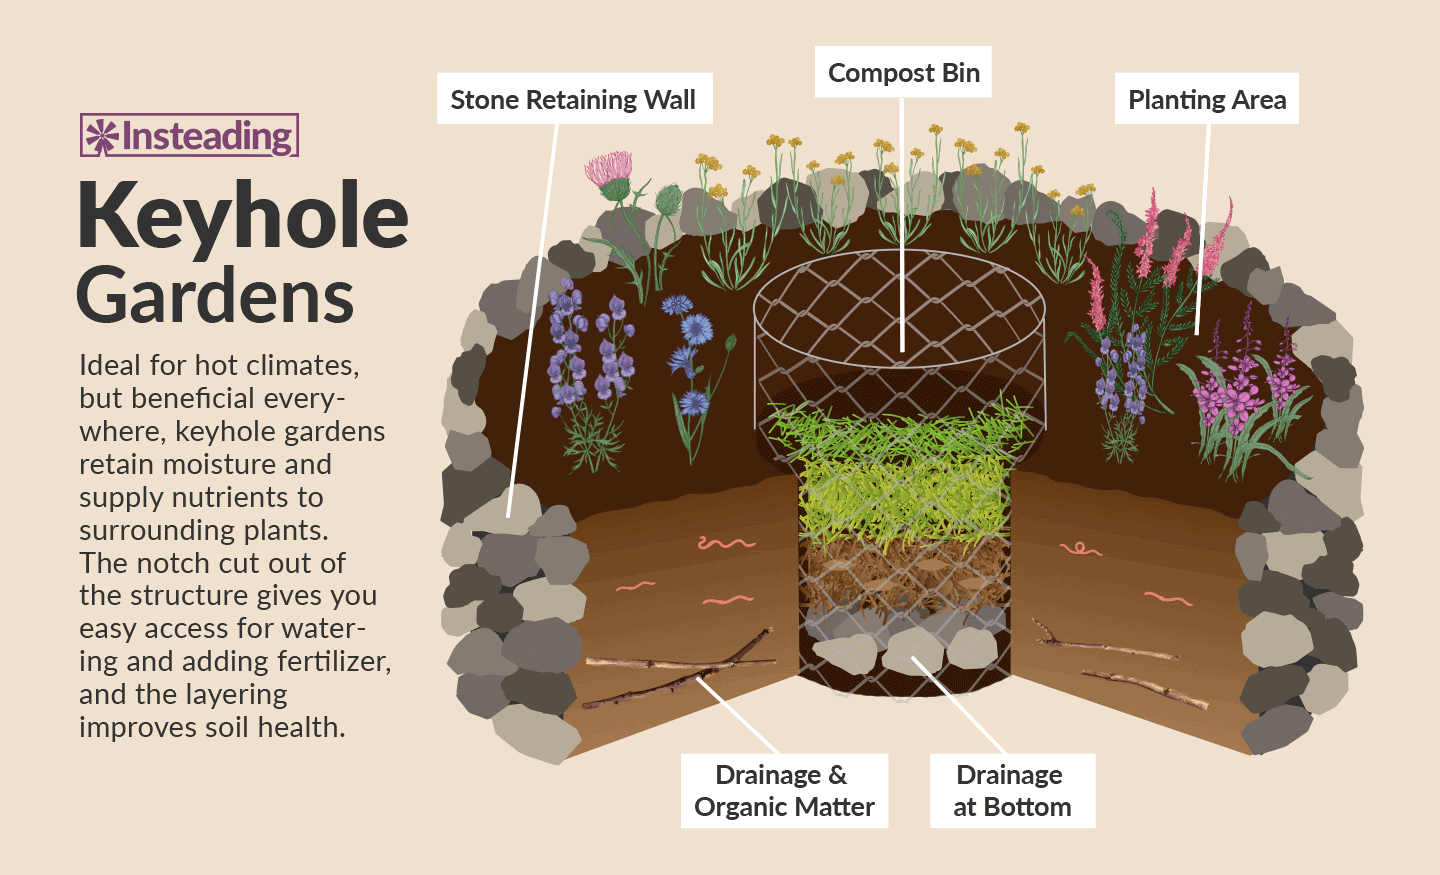
Gather some basic materials: you need wire to use to build the compost basket which goes to the centre of the garden (see diagram). Some bricks or whatever material you are going to use to build your garden. You will also need about 1 bag of cement, some pitsand and riversand for building the garden.
You need to site your location. This should not be rocket science if you have a small stand. The standard diameter of a keyhole garden is about 1m but you can make yours slightly larger or smaller depending on the space you have available in your yard. Remember if it’s too large you might not be able to easily reach its full expanse. Ideally, they ought to be circular in diameter to allow for an even distribution of moisture when you water them but they don’t have to be a perfect circle. Also, make sure the spot you choose gets adequate sunlight after all as you probably remember from your science lessons plants need sunlight to grow.
Create a compost basket/bin. Another thing that plants need are nutrients like nitrogen, potassium and phosphorus. They also need well-aerated soils. They can get this from compost and so you need to prepare the compost you will use to fill up your keyhole garden. The basket goes into the centre of the garden. You should build this using chicken wire. You can buy this from places like Siyaso in Mbare where it is cheaply made and sold. You can also use tobacco waste, chicken manure or any organic waste from your house to fill up the compost basket. The chicken manure/tobacco waste should form the bulk of organic material in there to make sure there is a good nutrient balance.
Build your walls. You can use any material you want to build your garden including bricks or even stones. While you can do the other parts yourself this might be where you will need a professional to lend a hand unless you have some building experience.
Fill up your garden with soil. You can use topsoil. Several companies sell topsoil. You can also make your own soil mixture - just make sure the particles are not too small (clay) or too large (sand). Add a generous amount of manure to your soil.
Plant your garden-You can choose the plants you want. I would recommend some tomato varieties. Some cultivars can sustain an entire household with one plant. You can also add some herbs or even leafy veggies.
Maintain your garden. This means regular watering and adding organic material to the compost bin.
That is all there is to it really. Tending and building your own keyhole garden can be a rewarding experience and the garden can even add a fresh look to your otherwise barren yard.
Powered by Froala Editor


